Error 0x00000e9 is usually related to a bad HDD (with corrupted system files) or due to invalid BIOS settings. The error 0x00000e9 appears at Windows boot process on a Windows 8-8.1, 7 or Vista based system and the full error message is:
“Windows has encountered a problem communicating with a device connected to your computer.
…………
File: \Boot\BCD
Status: 0x00000e9
Info: An unexpected I/O error has occurred.”
…………
File: \Boot\BCD
Status: 0x00000e9
Info: An unexpected I/O error has occurred.”
In fact the 0Xc00000e9 error message is telling you that the computer is having problems in communicating properly with your hard drive.
In this tutorial you can find detailed instructions on how to fix the 0x00000e9 error in Windows 8, 7 or Vista boot process.
How to fix Error 0x00000e9 on Windows 8, 7 Vista Startup.
Step 1. Modify BIOS Settings
Step 2. Repair Windows.
Step 1. Modify – Load Default – BIOS Settings.
1. Start your computer and press the appropriate key (DEL or F1 or F2 or F10) to enter BIOS settings. *
* The way to enter into BIOS Settings depends on the computer manufacturer. To Enter into your BIOS Settings, pay attention at the first screen as your computer starts and try to find a message like this:
“DEL to enter setup”“Press ESC to Enter Setup”“BIOS Configuration: F2”
“F10 to Enter Setup”
“F10 to Enter Setup”
2. Load Default Settings (Load Optimal Defaults)

3. Then look on all BIOS screens for a setting named SATA Configuration or SATA Mode or SATA Controller Mode or SATA Operation or Configure SATA as. (This setting is commonly found under the Advanced section).
4. Make sure that the SATA Mode (Type) is set to IDE or AHCI and NOT in RAID.

5. Save Changes and Exit BIOS Settings and boot on Windows.

Step 2. Repair Windows Startup problems.
1. From another computer download a Windows installation ISO image according to your OS version.
2. Burn the downloaded ISO image to a DVD disk.
3. Insert the Windows installation media (e.g. the Windows 8 Install DVD) you created before, at the system with the 0x00000e9 error and boot the system from it.
4. Press any key to boot from DVD when prompted.

5. At Windows Setup screen press Next.

6. Choose Repair your computer:

7. Then proceed to repair the Windows startup problems according to your OS:
For Windows 7 or Vista OS: (Windows 8 instructions).
- Press Next at the following screen. * Note: For Windows 8 or Windows 8.1see here:
- Then select Startup Repair.
(Now let the “Startup Repair” process to check your computer for problems.)
- At the end of the repair process two things (cases) can happen:
Case No1: Windows can find the problems and can repair them. If this happens:
- Remove the Recovery disk from the DVD drive.
- Press the “Repair and restart your computer” button.
- See if your computer can boot on Windows normally. *
* Notes if the Startup repair cannot fix boot problem(s) automatically:
a. Try to run the “Startup Repair” process two more times, because “Startup Repair” in most cases must run three (3) times until it fixes all problems.b. If the Startup Repair, cannot fix the 0x00000e9 error, then proceed to the steps at Case No2 below.Case No2: Startup Repair could not detect (or fix) the problem. If this happens, then:- Choose the View Advanced options for system recovery and supportlink.
2. Click at System Restore option to restore your computer to a previous working state.
3. Follow the instructions in this tutorial on How to Restore Windows 7 or Vista to a previous working state.
For Windows 8 or 8.1 OS:
- Select the Troubleshoot option at the following screen:
- Then choose Advanced options.
- Finally select the Automatic Repair options and follow the prompts to repair Windows.
- Choose your OS.
(Wait until the repair process finishes diagnosing your PC)
- At the end of the repair process two things (cases) can happen:
Case No1: Automatic Repair finds the problems and can repair them. If this happens:
- Remove the Recovery disk from the DVD drive.
- Press the “Repair and restart your computer” button.
- See if your computer can boot to Windows normally.** Notes if the Startup repair cannot fix the boot problem(s):
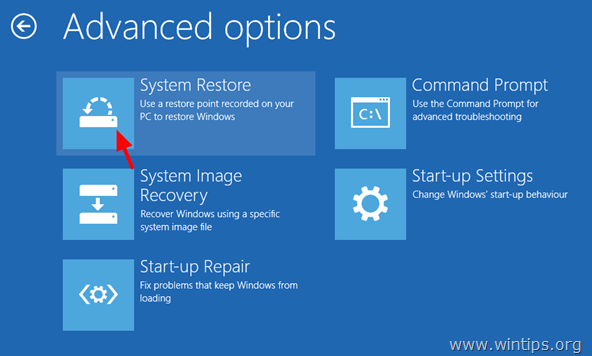
a. Try to run the “Startup Repair” process two more times, because “Startup Repair” in most cases must run three (3) times until it fixes all problems.b. If the Startup Repair cannot fix the 0x00000e9 error, then proceed to steps at Case No2 below.Case No2: Automatic Repair couldn’t repair your PC. If this happens, then:1. Choose Advanced options.2. Select the Troubleshoot option at the following screen:3. Then choose Advanced options.4. Choose System Restore.5. (If asked) Select an account with administrative privileges. Type the password for that account and click Continue.6. Follow the instructions in this tutorial on How to restore Windows 8 or Windows 8.1 to an earlier working state.
Additional help:
– If you cannot bypass the “0Xc00000e9″ error, by using the above steps, then try the following:1. Boot again from the Windows installation media and at Advanced options chose Command Prompt. At command prompt, type and execute the following command to check and fix hard disk problems: chkdsk /f /r C:When the operation is completed Restart your computer and see if Windows can boot normally. If Windows still cannot boot:2. Backup your personal data and then perform a clean Windows installation.After installation don’t forget to diagnose the hard disk for hardware errors. If the disk is damaged, then you have to replace the hard disk.Good luck!


0 comments:
Post a Comment